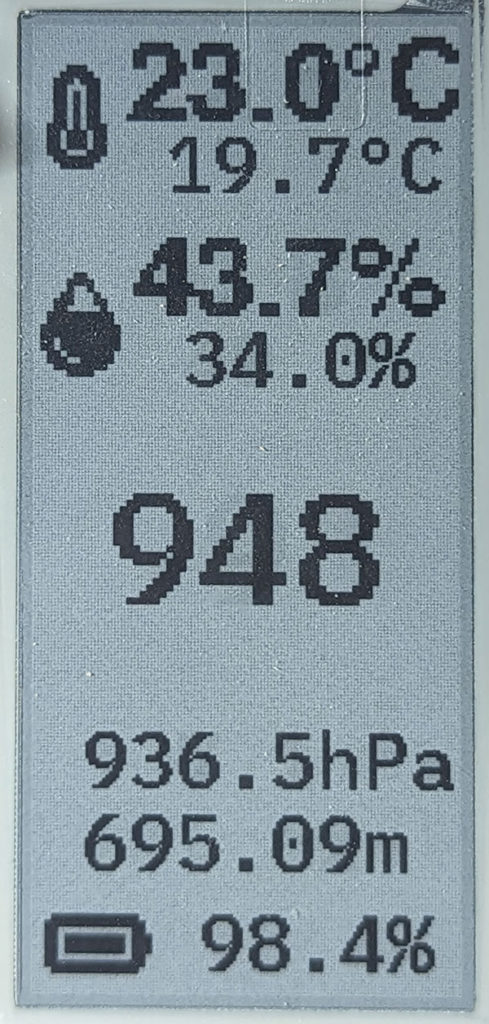
Measure CO2, temperature, humidity and send that data to the cloud, while displaying results on an 2.9″ e-ink display.
My first choice was to use the display vertically. It feels a bit less like a price tag in this orientation.
e-ink displays maintain their data even when power has been disconnected.
This past August 18th marked CircuitPython day, a celebration of Python on Microcontrollers. CircuitPython is an off-shoot of MicroPython maintained by Adafruit which aims to ease the use Python on constrained devices with limited RAM and Flash memory, reduced CPU. AKA Microcontrollers.
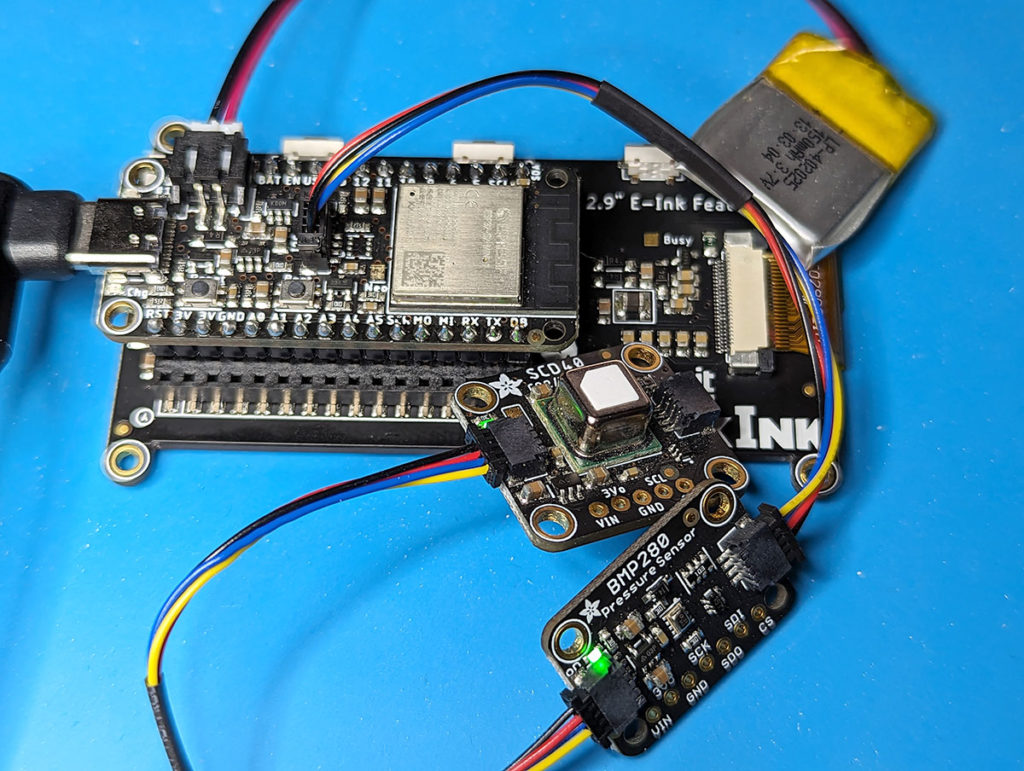
Beside indoor sensing of CO2, temperature, and humidity I’m also using the ESP32-S2 with Adafruit Requests library to fetch an XML file hourly from my local weather service for current outdoor temperature and humidity. Some challenges include when this xml feed changes due to weather events and warnings. I’ve included lots of try:except: blocks for each step of the Requests, Socket pool, Parsing to find where it was sometimes failing.
This BMP280 library also contains code I have happily contributed to which helps set the altitude of the sensor. Changes in pressure are registered as atmospheric rather than altitude.
E-ink is awesome for it’s low power. Combined with the ESP32-S2 deep-sleep capabilities I’ve managed to get hourly updates for days on a tiny 150mha battery.
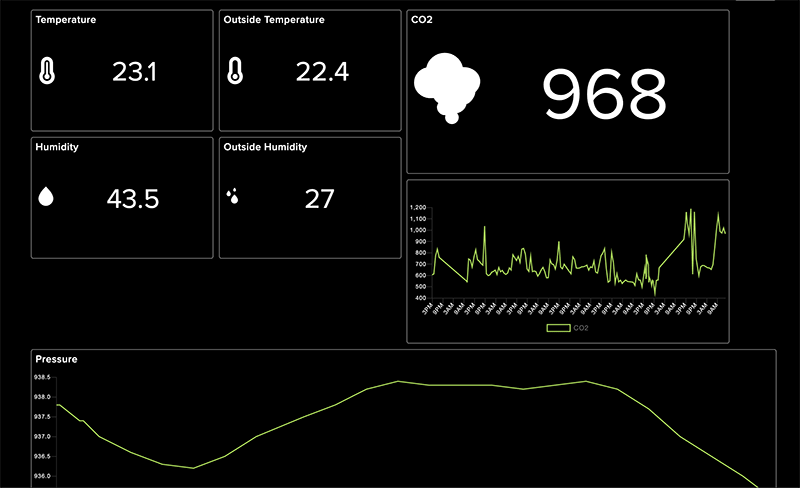
All of the data is shared hourly to Adafruit IO. A cloud service which provides dashboards, alerts, events, and recording of historical data.
Wildfire smoke has forced windows closed and thus high CO2 vlaues
The majority of work was laying out the e-ink display and data labels using the CircuitPython displayio library. Two separate fonts are used separating Inside vs Outside data.
One cool feature is using a spritesheet for the temperature, humidity, and battery icons. The data depends which icon gets shown:
As a serious microcontroller user or single board computer enthusiast, I have the choice to program with Arduino, C++, Python with Raspberry Pi, CircuitPython, JS etc. More often than not given this choice I choose CircuitPython.
Here is why I personally prefer it: 1) Mountable drive with code.py file – Plug in the device and it mounts like a thumbdrive on Windows, Mac, or Linux. Any text editor can immediately read and change the code running on the board. Not something that is immediate with Arduino.
2) The REPL – Or Read, Evaluate, Print, Loop on the command line. This allows you to test and run small bits of code without committing permanent changes.
3) Circup – A command line package manager that manages and updates libraries found on any board plugged into the computer.
4) The community – So many great people contributing and sharing in a very welcoming environment.
I have a couple ideas for a case or mount but happy so far and I wanted to share for CircuitPython day.
Over the holidays I came up with an idea to create a micro slot machine coded in #CircuitPython using the Adafruit 5×5 NeoBFF Led Matrix. A micro switch, or limit switch is used to ‘pull’ the slot machine arm. A Piezo buzzer bleeps and bloops familiar tones and may signal a win. Ding-ding-ding!
I paired this add-on board with the Atmel SAMD21 QTPY microcontroller which provided some issues with limited memory. This particular microcontroller has constraints which made this a fun challenge. The ESP32 and RP2040 versions of QTPY microcontroller boards on the other hand would allow for more advanced libraries to be used out-of-the-box and thus could have a much different solution.
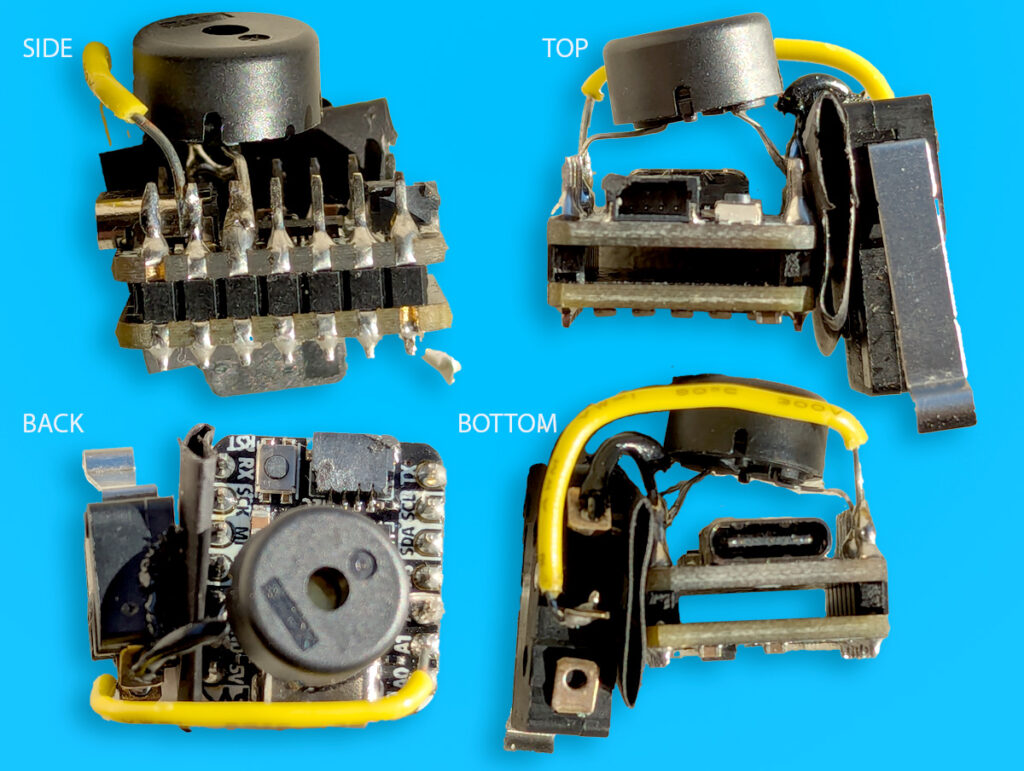
Pins used: The micro switch – ‘NO’ or Normally Open pin is on A1 The Piezo is on pin A2 which requires PWM The 5×5 matrix uses pin A3 by default All share ground
I first clipped 2 header pins of 7 then soldered the 5×5 NeoBFF on top of the headers while fitted in a breadboard. Next I soldered the QT Py board to the bottom of the headers, back-to-back, making sure to line the boards in the correct direction which is smartly printed on the back of matrix.
There is really no case or supports. The lever arm and piezo buzzer were soldered to the back with bits of wire dead bug style.
A piece of heat shrink tubing is wedged for some protection against short circuits
The right angle USB-C cable is perfect to have the matrix sit upright.
Almost all code is derived from some Adafruit CircuitPython tutorial. One of the key functions of the micro switch as slot machine arm was to have the action happen on the release or rise of the lever. This was made easy with Adafruit Debounce library.
from adafruit_debouncer import Debouncer if switch.rose:
The idea of the slot machine was to have 5 “Reels” which get randomly offset as they “spin”. Most physical slot machines will have different reel sequences but this example uses just one.
I declare hex values to identify the colour then manually created the “Reel” with different colour frequencies. Note the number of RED instances vs PURPLE.
RED = 0x100000 REEL = [RED,GREEN,YELLOW,BLUE,PURPLE,YELLOW,RED,GREEN,BLUE,RED,YELLOW,RED,RED]
On release of the lever the first step is animate the existing columns down until coming slowly to rest with a random offset on the reel.
Yup, this whole thing relies on random.randint(0,len(REEL)) So not a hardened gambling system.
I played with piezo tones, simulated physical mechanisms and settled on some familiar notes that some 8-bit fans may remember while collecting coins in another world. The final slot gets a slightly higher note, adding that audio and visual stimulation.
One of the most fun and satisfying puzzles was working with only the Adafruit CircuitPython Neopixel library to animate the 5×5 RGB matrix using a nested loop of columns and rows.
for i in range(5): #COLUMNS
    for j in range(5): #ROWS
Using various math equations, very simple but new-to-me discoveries via trial and error to produce very satisfying results.
pixels[20-(5*i-j)] = #TOP LEFT ACROSS
pixels[20-(5*j-i)] = #TOP LEFT DOWN
pixels[5*i+j] = #BOTTOM LEFT ACROSS
pixels[5*j+i] = #BOTTOM LEFT UP
pixels[24-(5*i+j)] = #TOP RIGHT ACROSS
pixels[24-(5*j+i)] = #TOP RIGHT DOWN
As earlier mentioned, the memory constraints were a fun challenge as well as using minimal parts on a basic microcontroller. Being a hobbyist with almost endless access to sensors, radios, and actuators can often lead to scope creep. Nothing stopping me from endlessly adding functionality until I get bored and quit. This one was fun to get at least to V 0.1
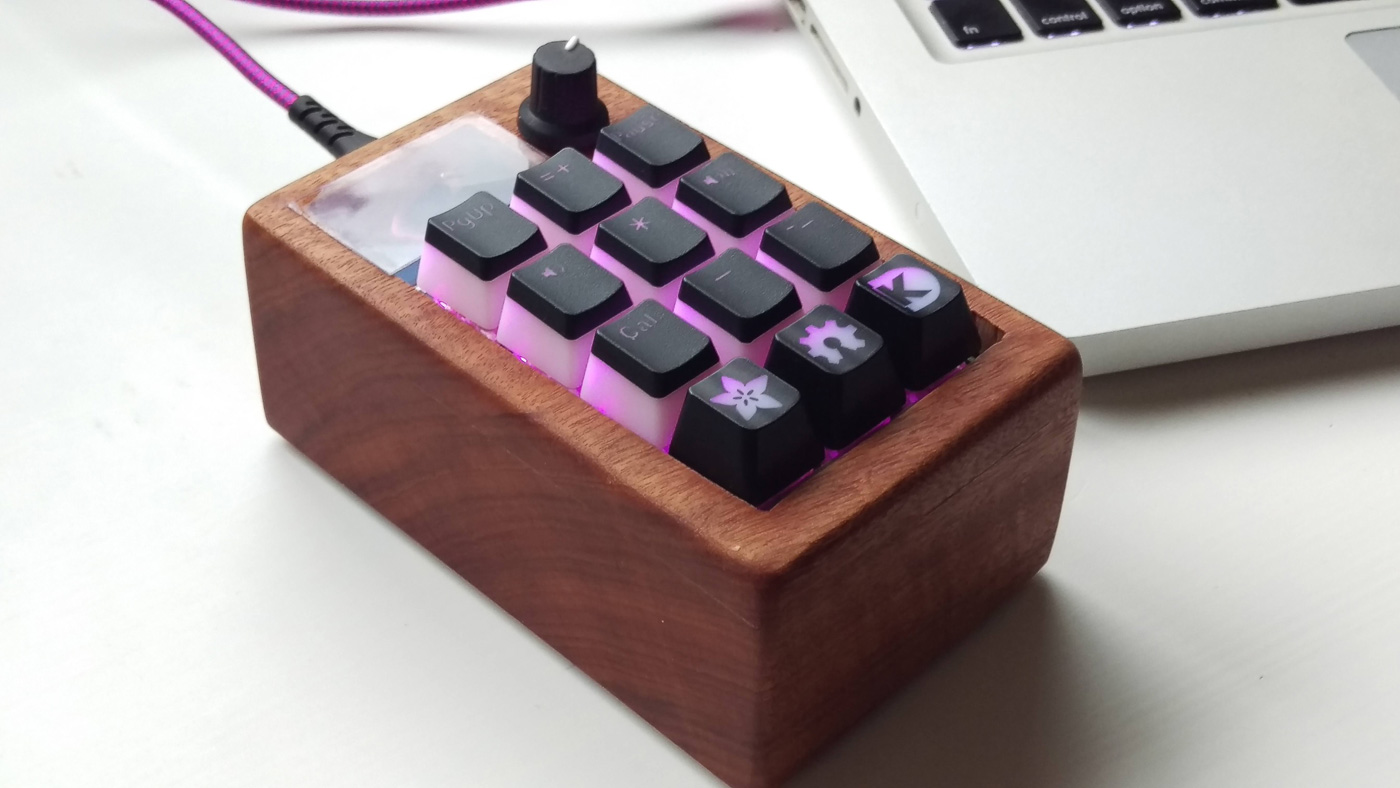
It’s an open source electronics kit, the Adafruit Macropad, embedded in a solid block of quarter-sawn tigerwood.
What can it do?
It’s a programable HID keyboard with OLED display and rotary encoder running CircuitPython. Which is a hardware specific, light-weight port of Python for microcontrollers. The keys have RGB LEDs and can be programmed to send single or multiple keystrokes to the computer.
It shows up as a mountable drive, you can live-edit the code.py file so when you save, the new code is automatically loaded. No compiling.
Similar to other computer mice, keyboards, or other peripherals it’s powered by USB so it does not run standalone.
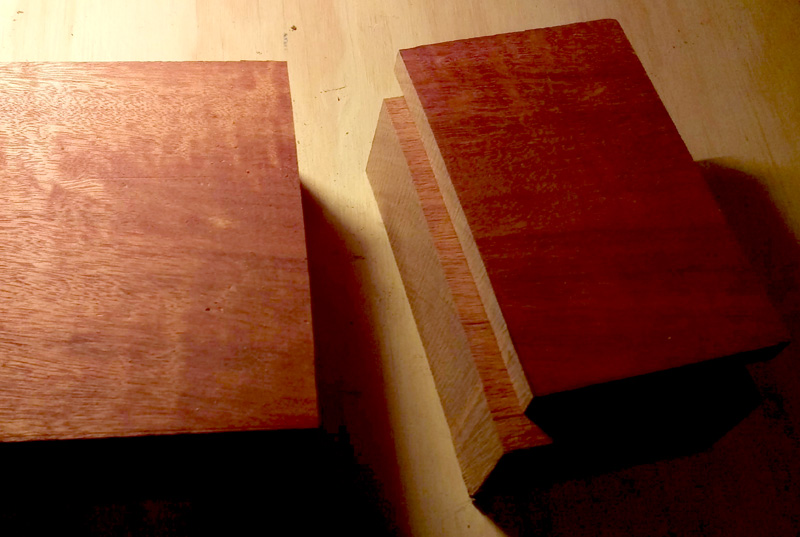
The Woodworking began as a solid block of South American Tigerwood. Nice pattern and hardness but I can’t say I enjoy the smell of this wood. It’s got a gluey stank which is not particularly enjoyable.
I used a bandsaw to take a 1/4 inch veneer off the top. This will be the cover.
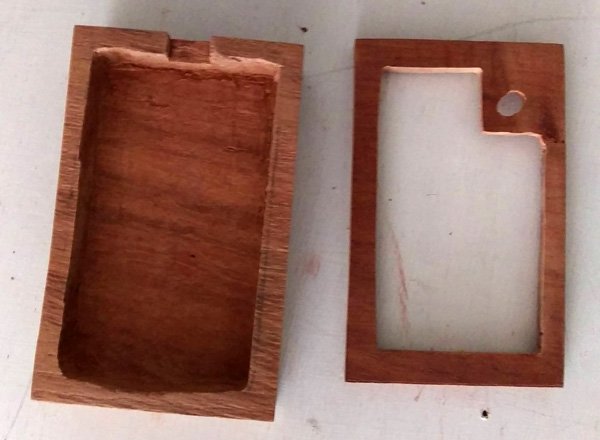
The bottom base was hollowed out using a plunge router. A device you must respect. It can clear out a lot of material quickly but at 10k to 30k RPMs it can easily get away from you in a hurry. Safety always first.
The two two pieces were then carved and fitted to accept the Macropad. It’s a bit of a shame to seal up the beautiful silkscreen art of this particular PCB.
The fitted Macropad had one other addition. I used a cut down credit card sized plastic magnifying glass using lenticular? magnification. The offset from the OLED gives the display a slight floating feeling.
Macrophotograpy of the Macropad
The project was finished with a couple coats of MInwax Tung Oil finish. Not a “true” tung oil but it makes the grain pop while not filling the wood pores.
The seams are a little more visible than I would like. From a distance however it’s not that noticeable. I’ve learned that minimal handling is required after separating using the “bandsaw box” technique to prevent “dings”.
As for programming I’m mainly using the application hotkeys demo found on the Adafruit Learning Guide but the sky is the limit because it can be programmed to do anything a keyboard or mouse can do.
The Super-Takumar 50mm f1:1.4 and Mighty Ohm Geiger kit The yellowing of the lens caused by the radioactive decay.
Last week marked the ten year anniversary of the Japanese earthquake and resulting tsunami that caused the Fukushima Daiichi nuclear disaster.
In the years following that tragic event, flotsam began arriving on the Pacific West Coast. Volunteers making great effort to return personal items back to family and loved ones in Japan.
Models showed the ocean currents and their possible nuclear contamination as it crossed the Pacific Ocean.
My interest in sensors and environmental monitoring led me to the relatively inexpensive Mighty Ohm Geiger Counter kit. A fun open-source microcontroller-based Geiger counter kit you solder together yourself.
Years ago I began collecting vintage film cameras, still occasionally shooting and developing my own B&W film today. Ebay was a great source for these antique objects of optical and mechanical precision, which were practically given away in the early days of the digital camera’s rise. Some film cameras are still sought after for collectibility and some manual focus film lenses got a new life with the use of adapters on digital cameras.
While I had an interest in detecting any increased environmental radioactivity from the event as a citizen scientist, my main motivation was testing old film camera equipment.
One of my favourite Ebay film camera purchases that I still use today is the Asahi Pentax Spotmatic SP. I got it as a “kit” with a large assortment accessories and quality lenses. At nearly 60 years old, these Super-Takumar screw thread M42 mount lenses have such a precise feeling. The range of prime lenses in this purchase included: Wide angle 28mm f3.5, Zoom 135mm f2, and Fast 50mm f1.4.
Small yet surprisingly hefty, the only way I can describe the focus dial is like the volume knob on an expensive stereo. Smooth resistance. The aperture dial clicks into each stop without wiggle. Lens covers are friction-fit without mechanical fasteners, hoods and cases, straps all immaculate condition and with such tight tolerances. I need a thesaurus for additional words for “precise”.
From this camera, and the 50mm f1:1.4 specifically, I created one of my personal favourite pictures of all time.
I have however heard stories of some lenses being radioactive and also that some cameras may have been looted from nuclear contaminated sites such as Chernobyl. In the late ’90s my camera of choice was a lomo smena 8m. Used mainly backpacking, there is really no lighter fully manual 35mm camera.
There are plenty of forums, articles, and Youtube vids, listing/discussing radioactive lenses. Thoriated glass was used for it’s optical properties perhaps before the effects of prolonged exposure to radiation were fully understood. While many dismiss the risks associated with owning or using this radioactive equipment, I’ll leave it for the reader to make their own informed decisions. A comical radiation dose chart from XKCD.com
I’ll admit, until I had a source of beta or gamma radiation, my geiger counter was essentially a really great random number generator. Blip… blip….blip. blip
My radiation detector is capable of detecting beta and gamma radiation but alpha radiation can not detected. A bit more reading about Thorium232 tells me that it actually decays emitting alpha radiation though.
Hang on, what’s going on?
Turns out the decay chain releases a “cascade” of fun alpha, beta, and gamma particles. The latter saturating the Geiger-Mueller tube sensor.
From the serial monitor getting close had the following readings: CPS, 18, CPM, 1080, uSv/hr, 6.15, FAST
Though detectable only close to the source, it’s hard to read these kind of numbers and say I want to go out and hold this up to my face for half a day.
And keep it the house with my family for years to come? Nope. Topes lose, Topes lose.
I wouldn’t even consider selling this lens at this point, even to someone who fully acknowledges the risks. Because while they might accept it, the logistics people, delivery drivers, shippers or anyone in between didn’t agree to that.
Question is, where and how do you dispose of this hazardous, gorgeous, and “precise” material?
UPDATE: I’m now in touch with the Historic Artefact Recovery Program (HARP) Operated by Canadian Nuclear Laboratories (CNL). The HARP provides technical advice, assistance, identification and management of radioactive artefacts found on public and private properties across Canada. Where necessary, the artefacts are transported to a licensed long-term storage facility located at CNL’s Chalk River Laboratories in Chalk River, Ontario.